7-minute read
Quick summary: How to set up the “last mile” configuration in AWS SageMaker Studio to set data science teams up for success
Productive data science requires a flexibility in tooling to explore and exploit advances in the science. Growth and adoption of cloud platforms and technologies by enterprises have sped up data scientists’ ability to tap into flexible toolsets and cutting-edge technology. Among the many tools available, cloud platforms have been developing their own suites of tools to help solve problems related to the machine learning development and production lifecycle, and among those is AWS SageMaker. SageMaker is one of the most powerful data science tools available, but achieving production-grade flexibility still requires thoughtful design.
As part of the SageMaker platform, SageMaker Studio brands itself as “the first fully integrated IDE for machine learning.” At Re:Invent 2021, AWS announced a preview version of SageMaker Studio Lab, which offers similar features to users who want to try out SageMaker Studio in a free tier capacity without the requirement of an AWS account. From that environment, users can develop their models and environment and migrate to full SageMaker Studio instances when they’re ready to scale. The investment in the platform for AWS shows the commitment to expanding the SageMaker Studio platform as a unified machine learning IDE moving forward.
SageMaker Studio was released to the general public in April 2020 and expands on SageMaker Notebooks. As for the SageMaker Studio product itself, it is based on the JupyterLab project, which treats Jupyter Notebooks as a first-class citizen. Beyond the JupyterLab environment, SageMaker Studio expands on the project by adding elements for interfacing with the MLOps lifecycle, such as Model Registry and SageMaker Pipelines.
With all the investment in the SageMaker Studio platform, one would think that it comes out of the box fully configured for data science teams to adopt. This is not the case, and there is a non-insignificant addition of overhead when it comes to the “last mile” configuration to set data science teams up for success.
Architecture
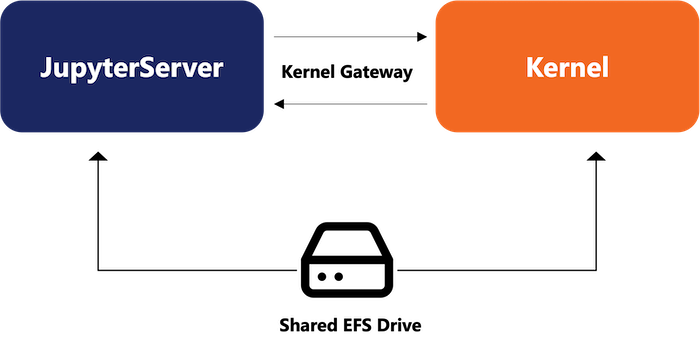
Before understanding “last mile” configuration of SageMaker Studio, one needs to understand a little bit more about its architecture. One of the features that makes SageMaker Studio so powerful is the ability to spin up kernels that are attached to separate computing instances of specified size and leverage them to run experiments. This enables a seamless workflow of testing out models and code on smaller, cheaper instances and scaling up to larger workflows easily. (The prior workflow of leveraging pure SageMaker Notebooks required a full shutdown of the instance, an offline update of the instance size, and turning on the notebook instance again.) Both SageMaker Kernels and JupyterServer are backed by a persistent elastic file store drive, so data is persisted when instances are shut down.

A tradeoff of this architecture is that there are two separate compute environments that operate slightly differently. For example, the configuration of the JupyterServer defaults to user being declared as ec2-user, and kernels are generally run as root. This can affect logic and setup of lifecycle configurations, as the shared volume is mounted to two separate home directories.
Lifecycle rules
These environments can be customized with lifecycle rules on the JupyterServer. However, as of the time of this writing, documentation is somewhat limited and clear path forward on correct setup and configuration. AWS posts code for lifecycle rules, but few details on implementation.
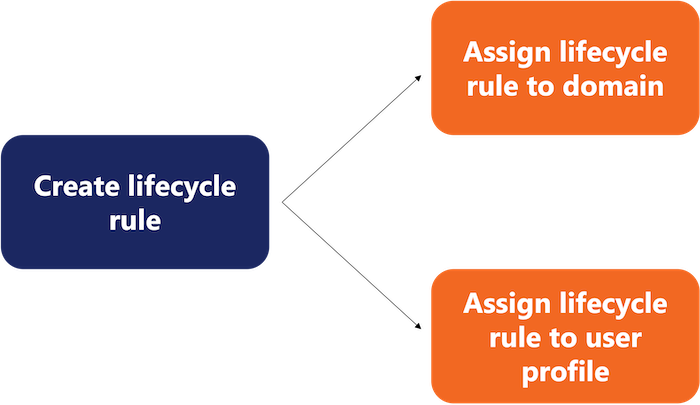
Lifecycle rules are a multi-step process to configure. The rules are written as shell scripts, registered to the domain as either KernelGateway (to execute in the temporary kernels) or JupyterServer (to run on the persistent server, generally as administrative tasks), then assigned to either the target user profile or the target domain (to allow all users to access the rules).


As of the time of this writing, there is no way through the console interface to create lifecycle rules for SageMaker Studio, and they need to be created programmatically, either through Shell or the Python Boto3 library. See examples of lifecycle rules on GitHub here.
Kernel shutdown (DO THIS FIRST)
Computing in AWS can tend to get expensive, and kernels are generally around 20 percent more expensive than the equivalent EC2 instances. Like EC2 instances, you only pay for the time used, but as a side effect, if one is left running, it can run up the AWS bill quickly. This can create a negative user experience and prevent adoption. This is a rule that is so important, it should be a native feature.
Fortunately, one of the AWS Sample lifecycle rules linked above has the code for installing a JupyterLab extension. This code can be leveraged like so using boto. A similar use can be taken with the AWS CLI:
import base64
import boto3
session = boto3.Session()
client = session.client('sagemaker')


# taken from: sagemaker-studio-lifecycle-config-examples/on-jupyter-server-start.sh at main · aws-samples/sagemaker-studio-lifecycle-config-examples · GitHub
extension_install_script = '''
set -eux

sudo yum -y install wget

# Saving the tarball to a file or folder with a '.' prefix will prevent it from cluttering up users' file tree views:
mkdir -p .auto-shutdown
wget -O .auto-shutdown/extension.tar.gz https://github.com/aws-samples/sagemaker-studio-auto-shutdown-extension/raw/main/sagemaker_studio_autoshutdown-0.1.5.tar.gz
pip install .auto-shutdown/extension.tar.gz
jlpm config set cache-folder /tmp/yarncache
jupyter lab build --debug --minimize=False

# restarts jupyter server
nohup supervisorctl -c /etc/supervisor/conf.d/supervisord.conf restart jupyterlabserver
'''

domain_id = client.list_domains()['Domains'][0]['DomainId']

studio_lifecycle_config_response = client.create_studio_lifecycle_config(
StudioLifecycleConfigName='sagemaker-shutdown-extension’,  StudioLifecycleConfigContent=base64.b64encode(extension_install_script.encode('ascii')).decode('utf-8'),
    StudioLifecycleConfigAppType='JupyterServer',
)

client.update_domain(
    DomainId=domain_id,
    DefaultUserSettings={
        'JupyterServerAppSettings' : {
            'DefaultResourceSpec': {
                'LifecycleConfigArn' : studio_lifecycle_config_response['StudioLifecycleConfigArn'],
                'InstanceType': 'system'
            },
            'LifecycleConfigArns' : [
                studio_lifecycle_config_response['StudioLifecycleConfigArn']
            ]
        }
    }
)
After restarting JupyterServer, the extension controls appear on the left-hand side of the Studio interface, where timeout limits can be configured.
Environment management
Sharing environments in SageMaker Studio can be a pain. SageMaker notebooks have a “sharing” capability that only allows other users to see the content of a SageMaker Notebook, but this requires some creativity when it comes to environment management.
Kernels are short-lived processes, and if conda is used for environment configuration (say though a Kernel Gateway Lifecycle Config Rule), installation can add considerable upstart time and can tend to hit the five-minute lifecycle timeout.
Using self-managed Docker containers through AWS Elastic Container Registry is ideal. This helps reduce upstart time to a specified environment and allows an environment to be shared across users for a consistent compute environment.
However, if a data scientist wants to install a single package in a reusable environment—and doesn’t want the environment to be production-ready—the data scientist needs a way to manage persistent conda environments.
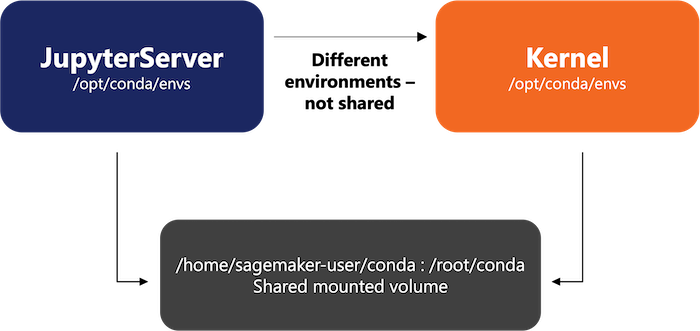
A limitation of the default shared conda environment is that the default location of conda environments from the JupyterServer is not accessible by the Kernel execution environment and vice-versa, as only the home directory is shared (see below).
A method we’ve used is to create a separate conda environment repository in the home directory and install new environments in there. These can be activated from within Image Terminals (see below). To leverage these environments from within JupyterNotebooks, install iPyKernel from within the kernel as a one-off process, and new conda environments are accessible through the dropdown in the SageMaker Notebook Interface. This approach was adopted from this guide from AWS, simplified and updated to work with SageMaker Studio.
# From JupyterServer
mkdir conda
conda config --add envs_dirs /root/conda
conda config --add envs_dirs /home/sagemaker-user/conda

# Important – Run inside image terminal in kernel
conda create --name myenv python=3.7.10 -y # defaults to new environment
conda activate myenv
pip install ipykernel

# Restart kernel from the Jupyter Notebook interface
From notebooks, conda environments are accessible as kernels when setting up the environment for Jupyter Notebooks.
As a note, this was an approach our team used. SageMaker Studio is an evolving product, and Amazon may change internal functionality and configuration of JupyterServer and Kernels in the future.
Conclusion
SageMaker Studio is a powerful tool with lots of features to enable production-ready MLOps tools and workflows. AWS has shown their commitment to the product since its launch. However, for adoption and administration of the tools, there can be a steep learning curve for understanding optimal configuration that makes sense for their teams. Before adoption of any tool, technical management needs to understand the associated configuration and administrative overhead to enable effective development for their teams.
Like what you see?

Alex Johnson is a Senior Developer in Logic20/20’s Advanced Analytics practice.

